 "MrAaro" (mraaro)
09/08/2015 at 06:14 • Filed to: the garage, projects, paint, jeep
 16
16
 14
14|
"MrAaro" (mraaro)
09/08/2015 at 06:14 • Filed to: the garage, projects, paint, jeep | 16
| 14 |
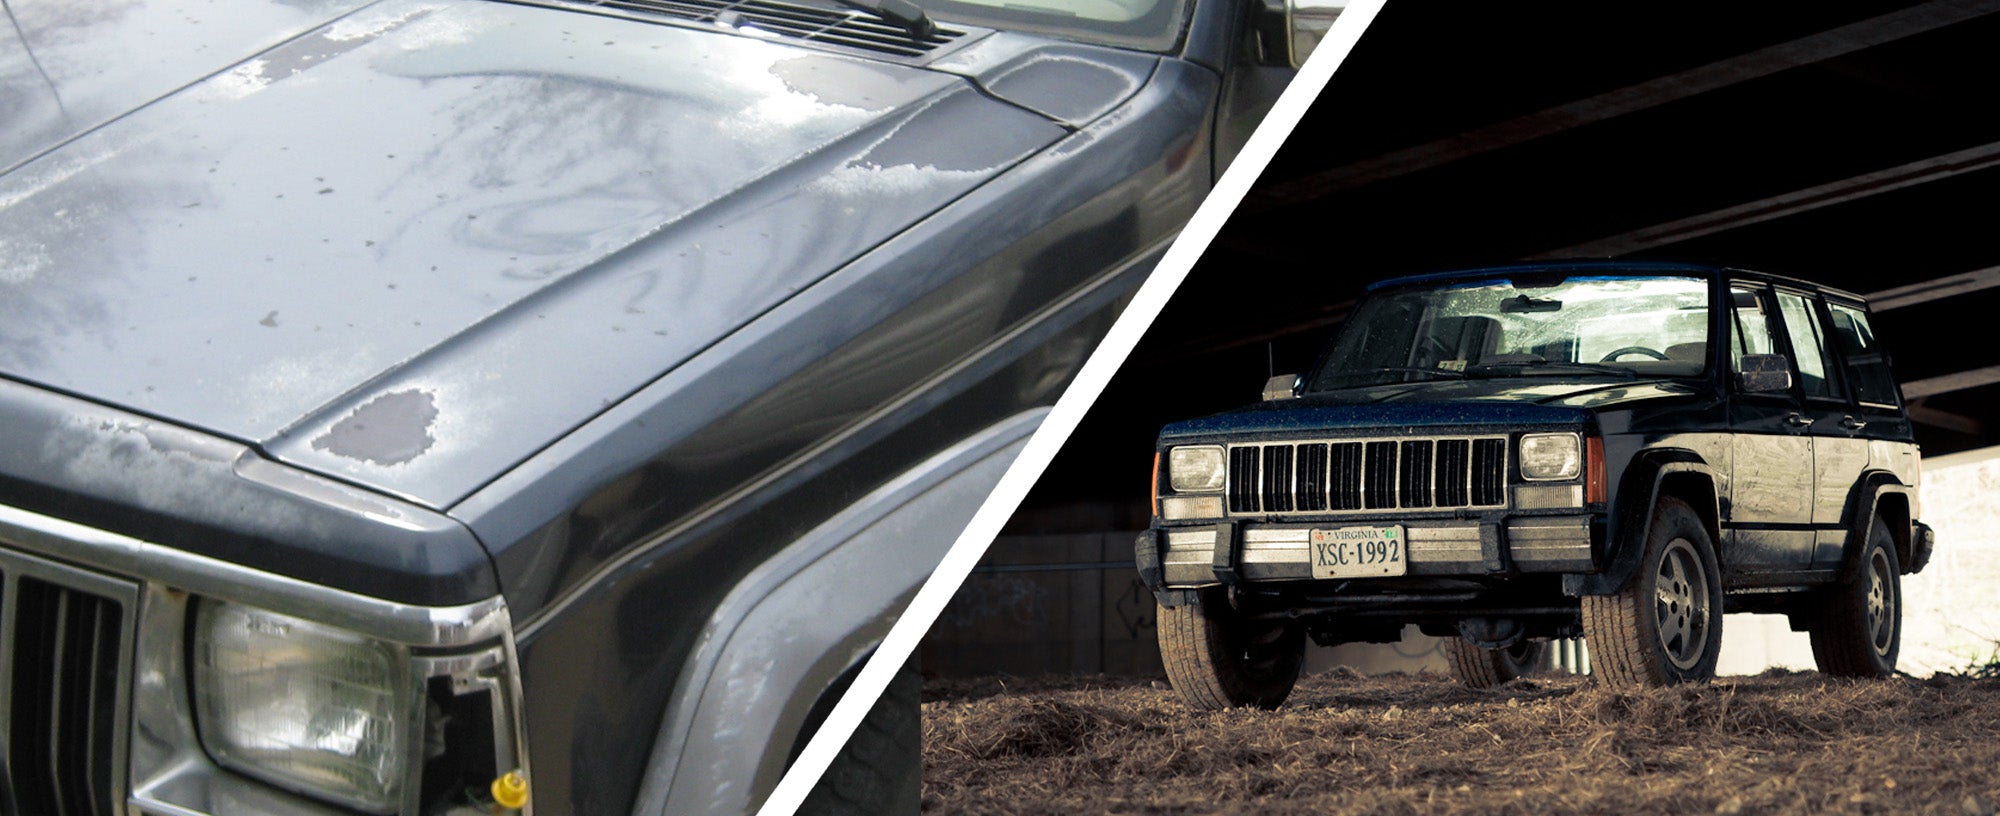
My $1000 XJ “Bonny” (you may remember her !!!error: Indecipherable SUB-paragraph formatting!!! ) badly needed a paint job, and I was low on cash. I went to Maaco and got quoted $1000 for a paint job (“We’re all out of the cheapest paint, and this needs a lot of prep work,” they said), so I decided, “F this and my neighbors, I’ll do it in my backyard!” So I picked up some sandpaper and primer from Sherwin Williams, ordered a HPLV paint gun and some single stage paint online (which sucked by the way, for reasons to be revealed), borrowed a buddy’s compressor, and proceeded to undertake the cheapest and dirtiest single stage paint job project known to man.
Before attempting, here is a fair bit of warning: during the process (and for the first few months after it was done), I swore to myself that I’d never try something so dumb again. Looking back now though, the “after” pictures make it same worth it. But do not be fooled—it’s a buttload of work. During this task, if undertaken, you will curse yourself, your equipment, your car, your paint, and your decision-making abilities. You have been warned.
The Prep
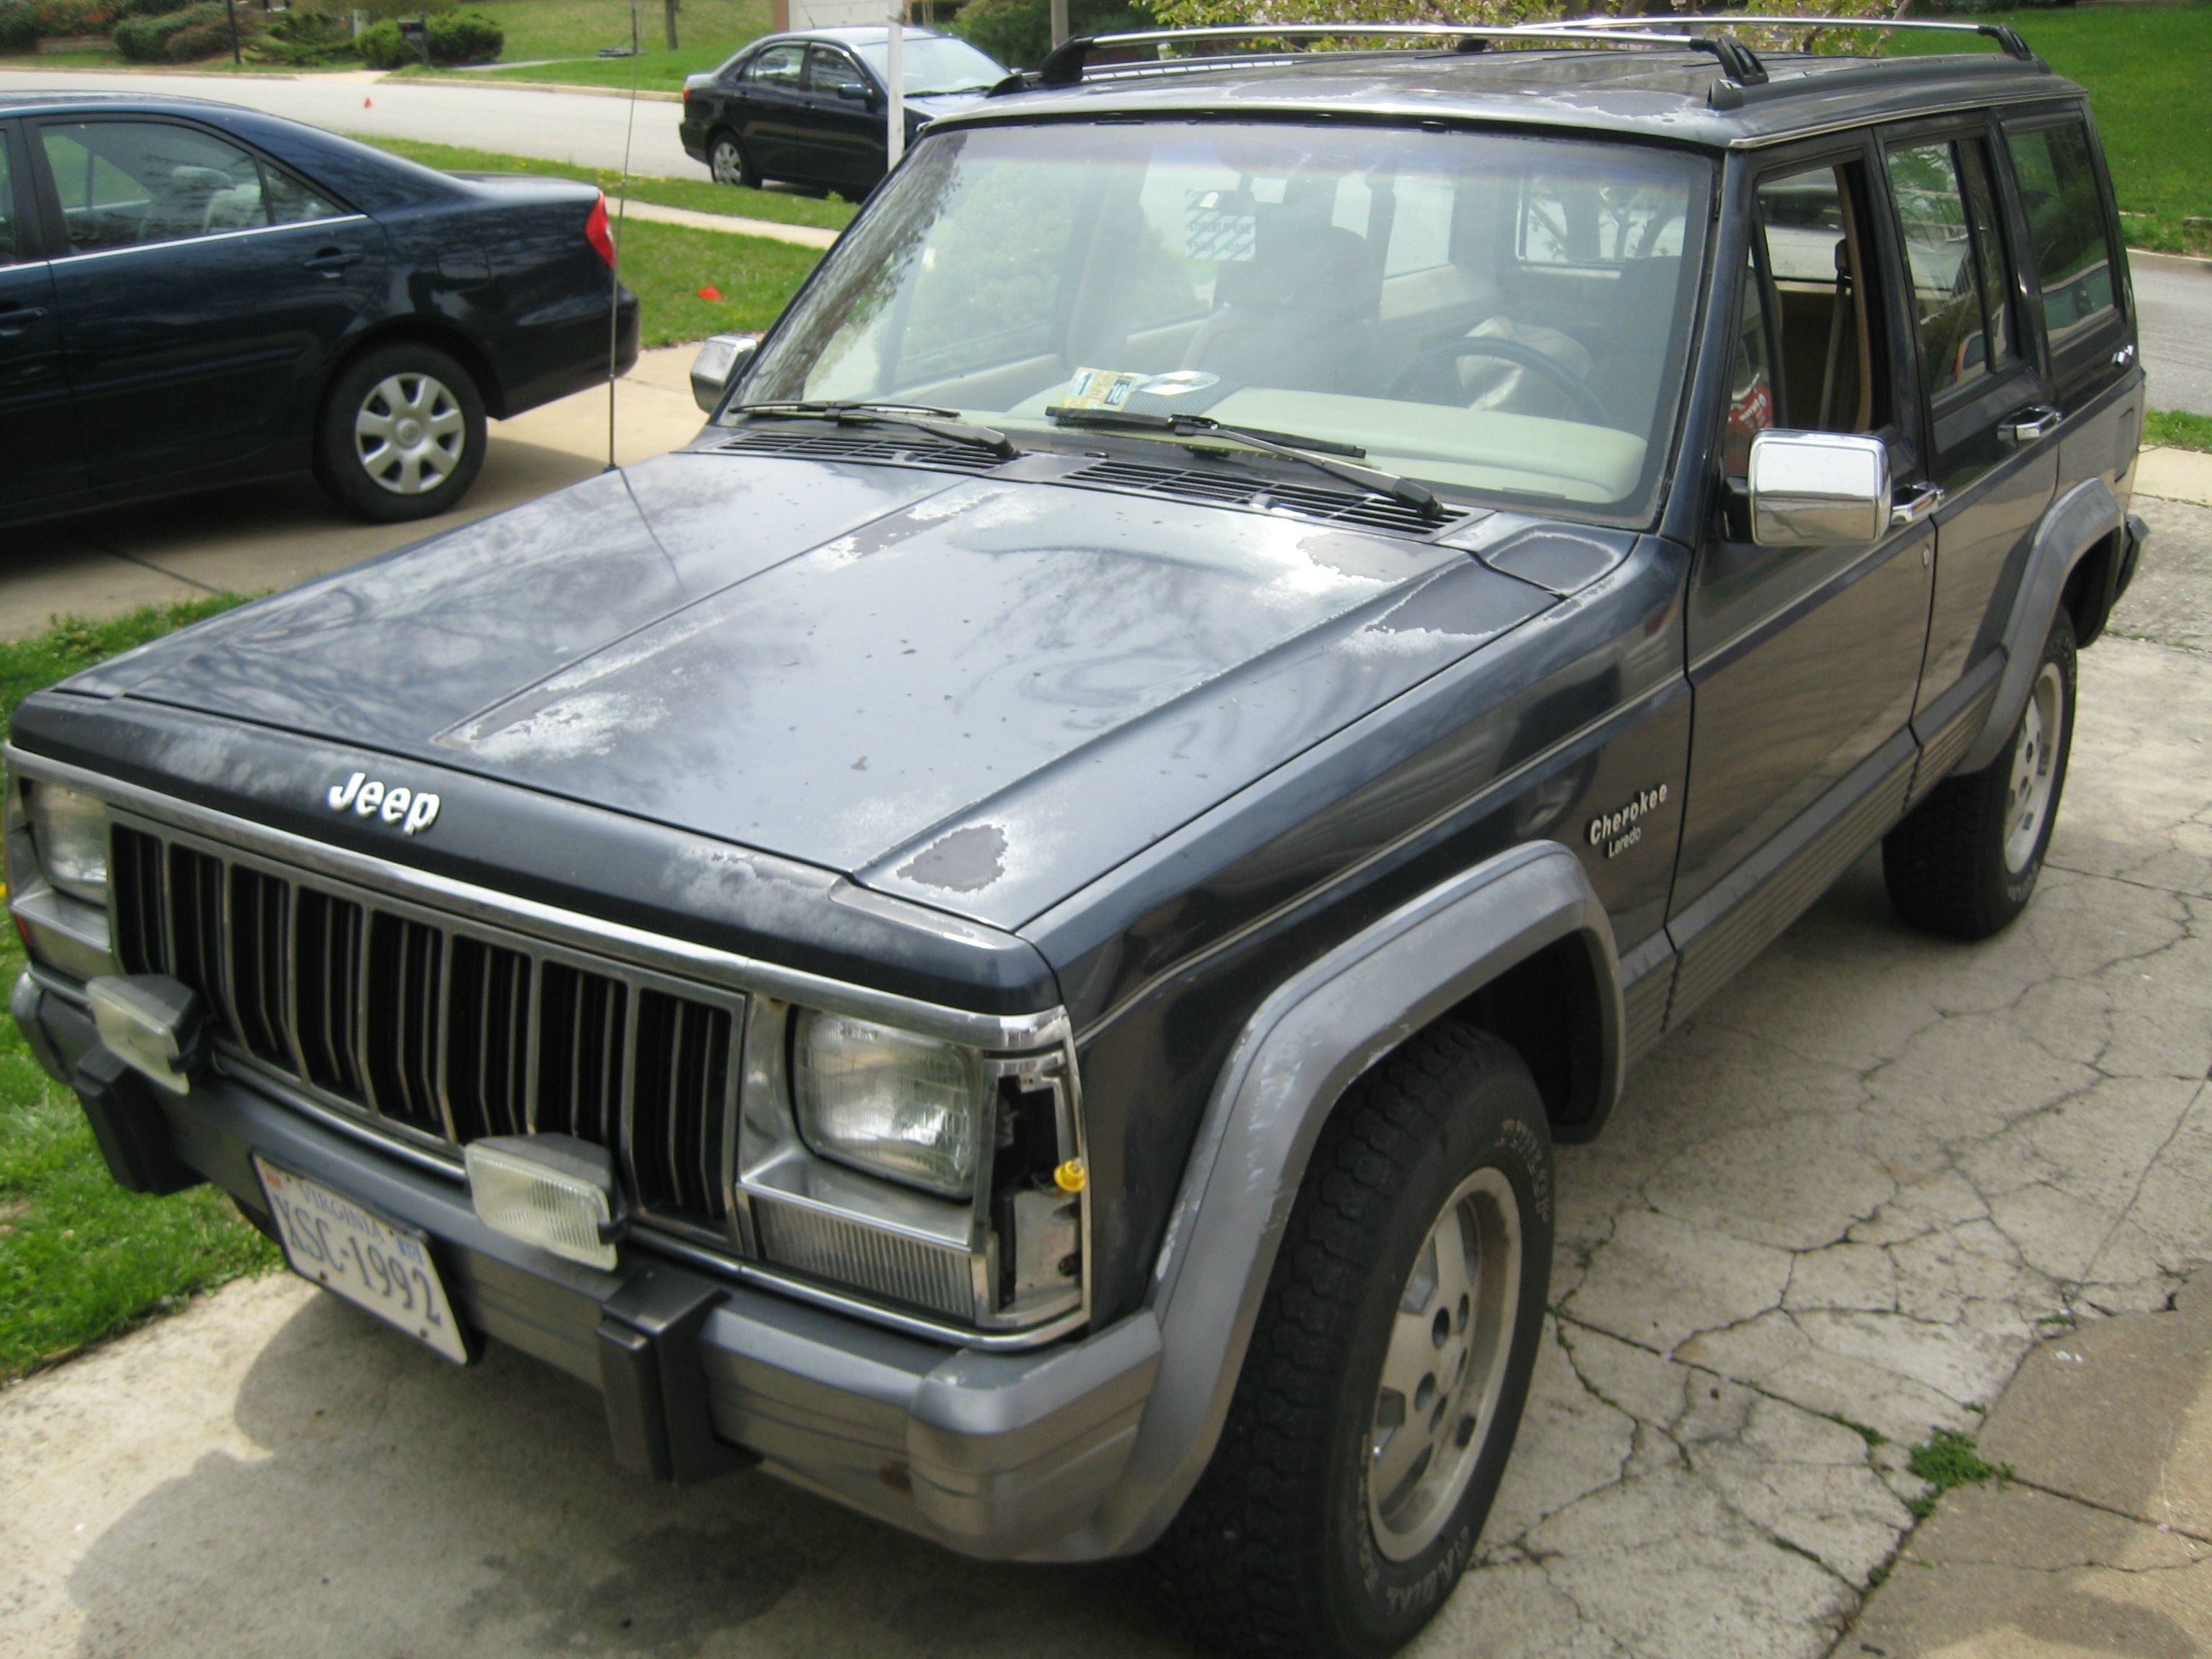
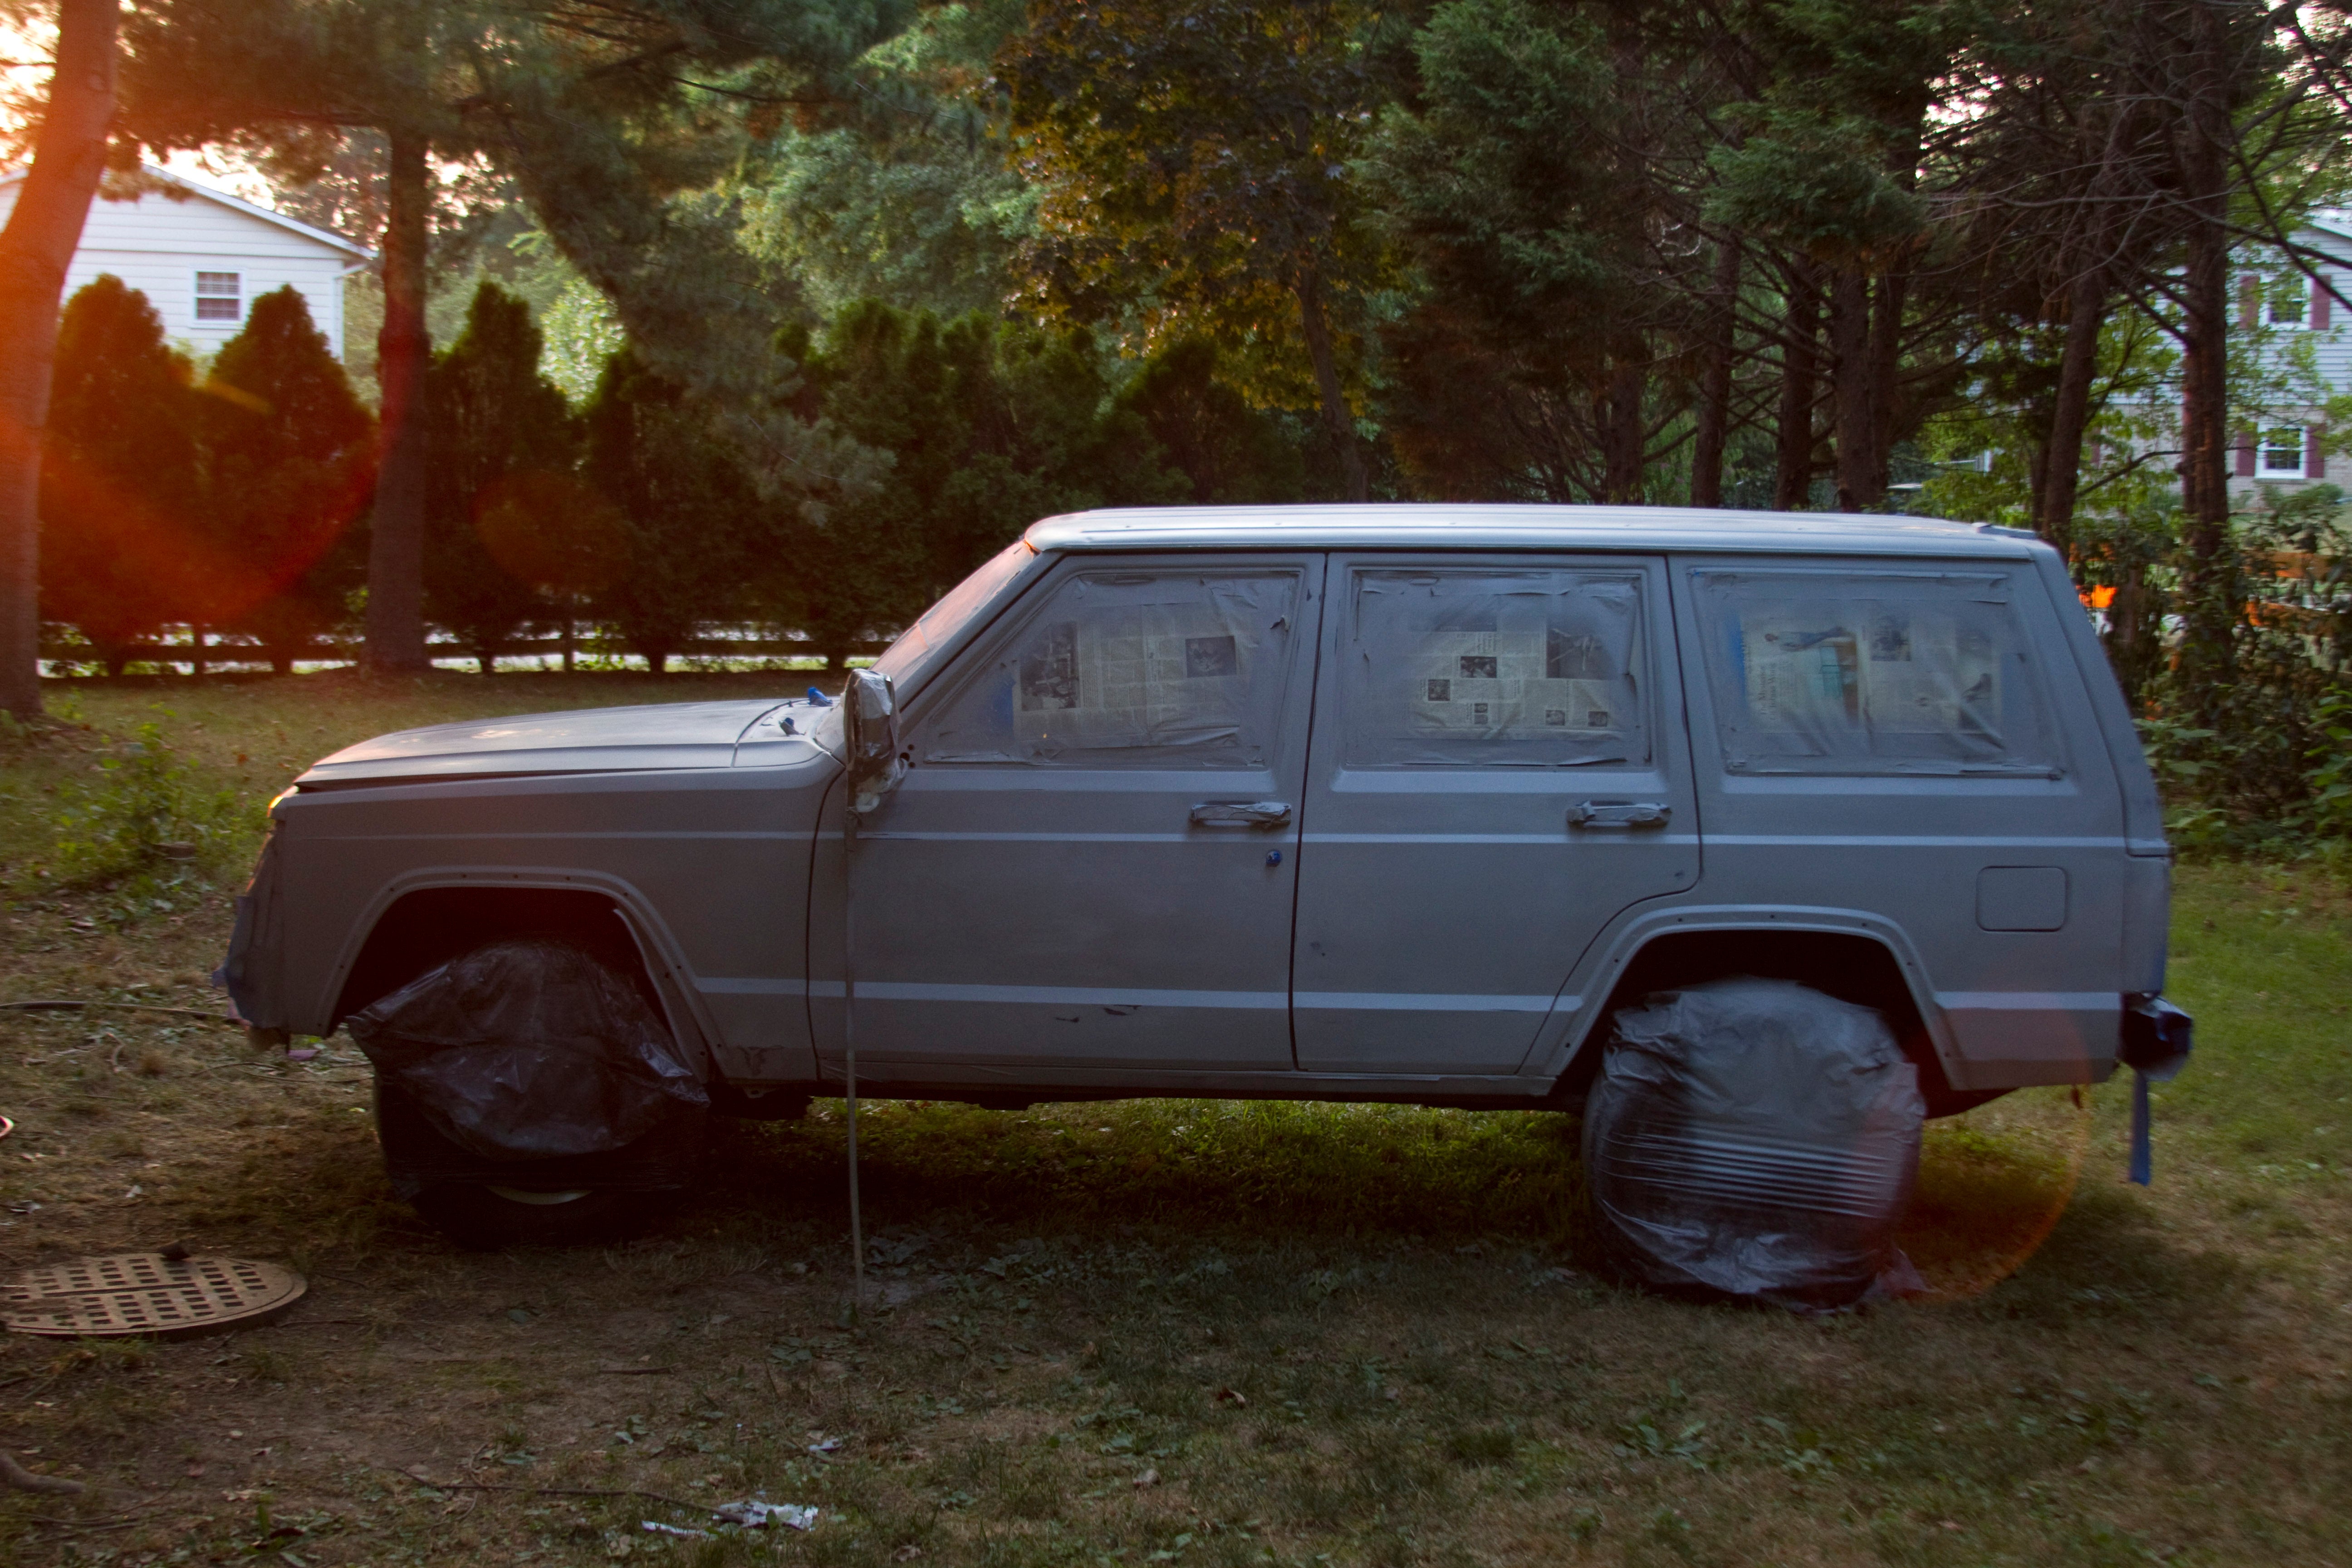
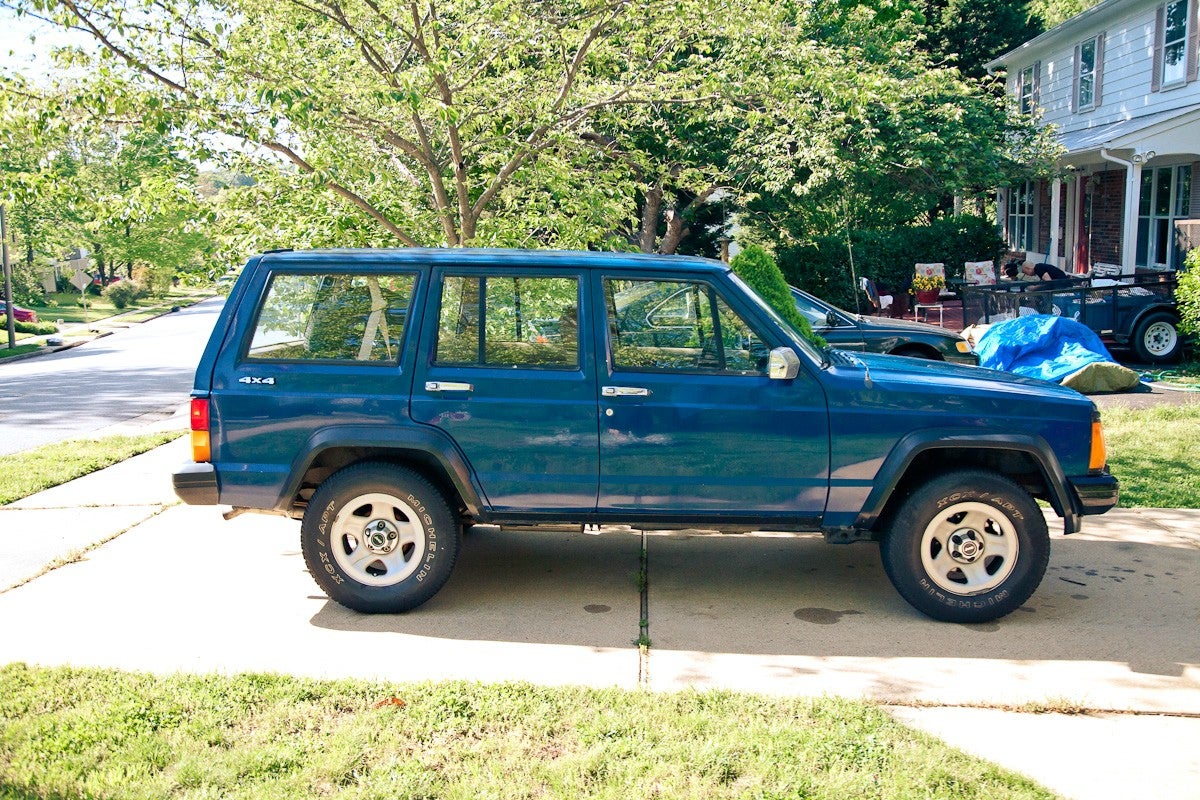
My 1992 Jeep Cherokee had spent one too many years in the sun and was showing some ugly
liver
faded spots on its finely aged Midnight Blue body. The first step (and most important, as I read over and over and over again) in any paint job is the preparation. Therefore, I was mentally prepared for the labor of love comprised of stripping and sanding. It’s like the new masochistic Gentlemen’s Club you’ve never heard of.
I proceeded to strip all the trim and badges off the old, beaten up body (including the two mismatched fenders, since both of my original fenders had dents the size of a horse’s dick when I got the car). My XJ had some decal type stuff on the lower parts of the doors that also needed to go. For that job,
!!!error: Indecipherable SUB-paragraph formatting!!!
came in handy. It’s essentially a circular eraser that attaches to your drill and makes quick work of removing pinstriping and decals.
Surprisingly, the prep didn’t take as long as I expected. It helped that I was going for a quick-and-dirty paint job (which ultimately ended up being none of the former with plenty of the latter) that eschewed bondo in favor of just replacing body panels. As mentioned, I had previously acquired two straight gray fenders and a nice, non-dick-size-dented hood that were just waiting for their chance to ride my midnight blue Jeep. The total cost of these high-end junkyard-quality parts: around $50.
The Primer
I had done all of the sanding in my driveway, but decided that an area more secluded from NOVA neighbors would be ideal for the actual spraying process. So I drove the Jeep to the backyard, taped up everything I didn’t want painted (head/taillights, wheels, windows), stuck the mirrors on sticks so I wouldn’t have to disconnect the cables, and proceeded to load up the gun.
Now, this was my first time using a spray gun. In fact, it was my first time using any tool connected to an air compressor. But they’re not that complicated, right? I had watched plenty of Youtube videos to help me get in the right mindset to operate the spray gun. And I had read plenty of articles that said buying a high-quality spray gun would save many a headache—but that is advice I foolishly ignored, since it would not fit my theme of cheapest-possible-but-let’s-not-count-time-since-it’s-not-money paint job.
Long story short, I loaded the gun with primer and shot off a few coats. Yuck. No matter what adjustments I made, the primer would land and form a textured surface. Oh well. I got into the habit of spraying a few coats every evening and then sanding it down the next day. I worked in the evenings for two reasons: (1) I was working 40-50 hours a week so daytime was a no go (2) this was the middle of July in Virginia, meaning that shooting during the day would mean spraying a sun-heated car, which I assumed would have some kind of adverse effect on the paint. I think I did this three times before running out of primer and saying “screw this, it’s painting time!”
The Paint
I ordered the paint from eBay (because the cheapness), but also because it came from a company with a fancy website. It was cheap indeed ($92 shipped for a gallon of single stage paint) and the seller had good feedback, so what did I have to lose?
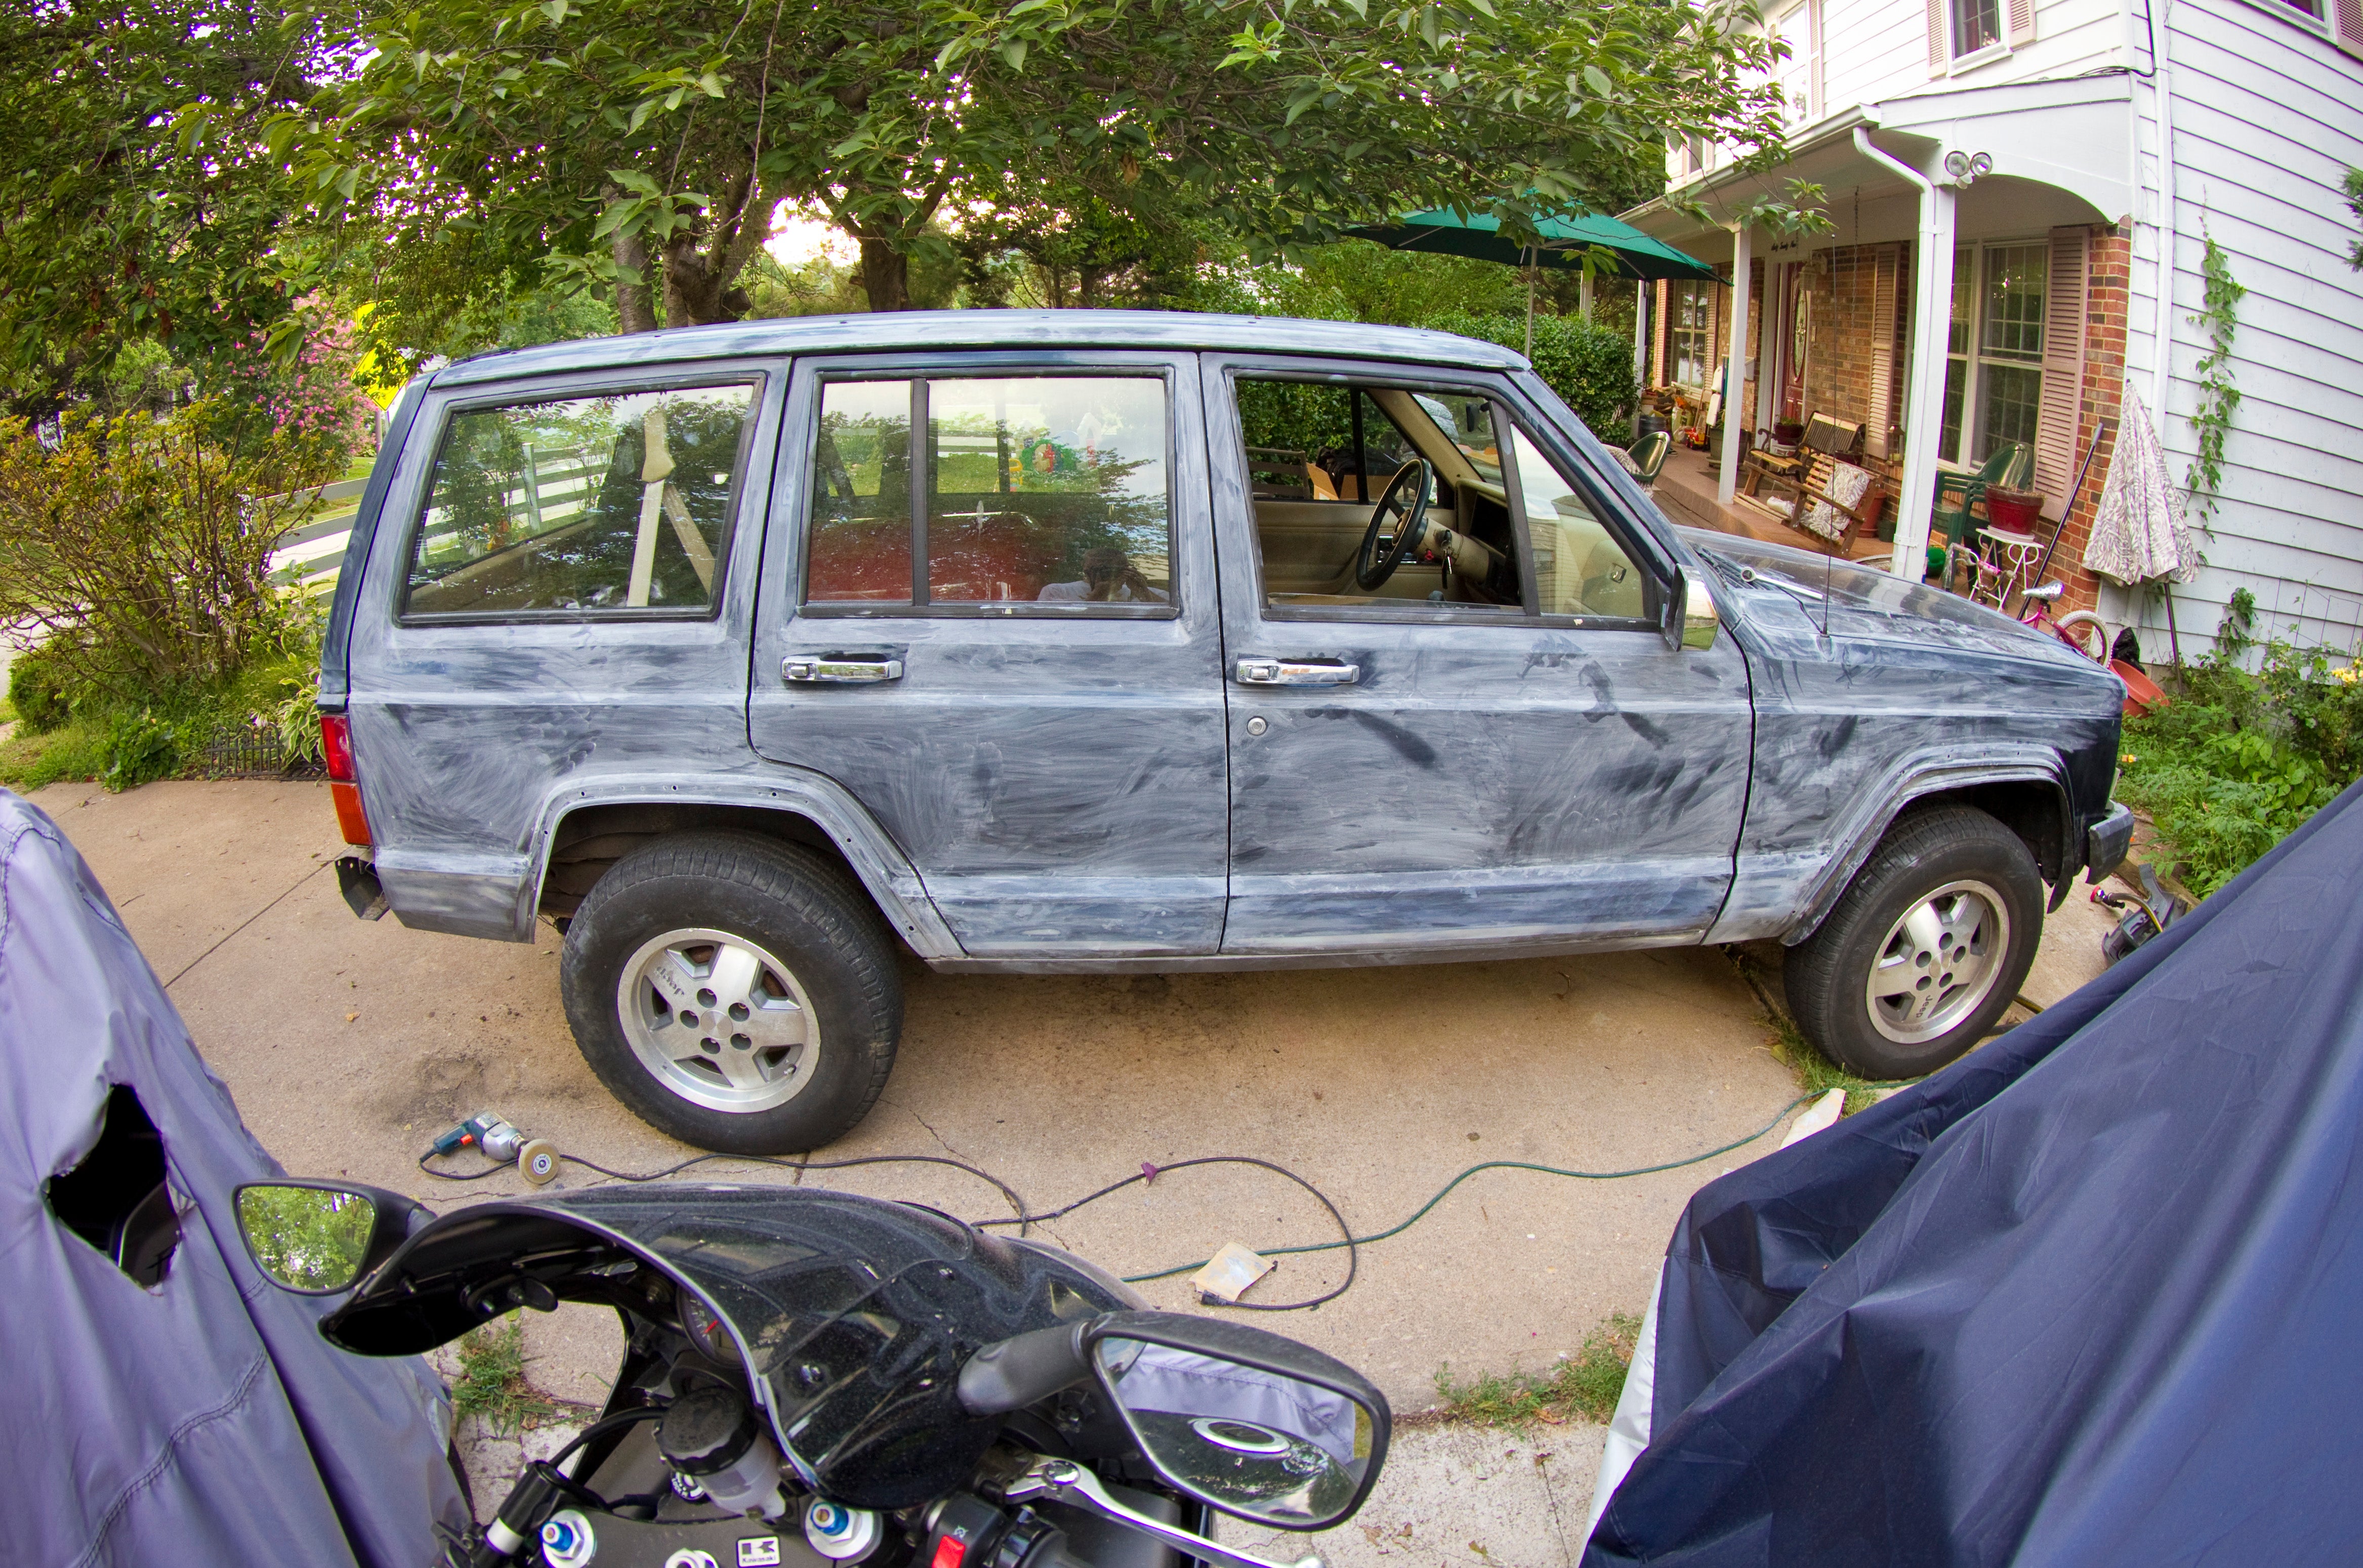
When I opened the can, it looked surprisingly bright to be what was advertised as “Midnight Blue” (which was the factory color of my Jeep). But, this being my first time taking part in the spraying arts, I assumed it would darken considerably as it dried. So I mixed up some paint, stuck it in the gun, fired up the compressor, and took some test shots.
Unfortunately, I had the same experience as with the primer: the paint was also textured (orange peel everywhere!) no matter what adjustments I made to the gun or how much thinner I added to the paint. Oh well. This is when I pulled the painter’s equivalent of the in-over-his-head photographer’s phrase “I’ll fix it in post!” and proceeded to spray the Jeep with spray that would have made a Florida citrus farmer proud.
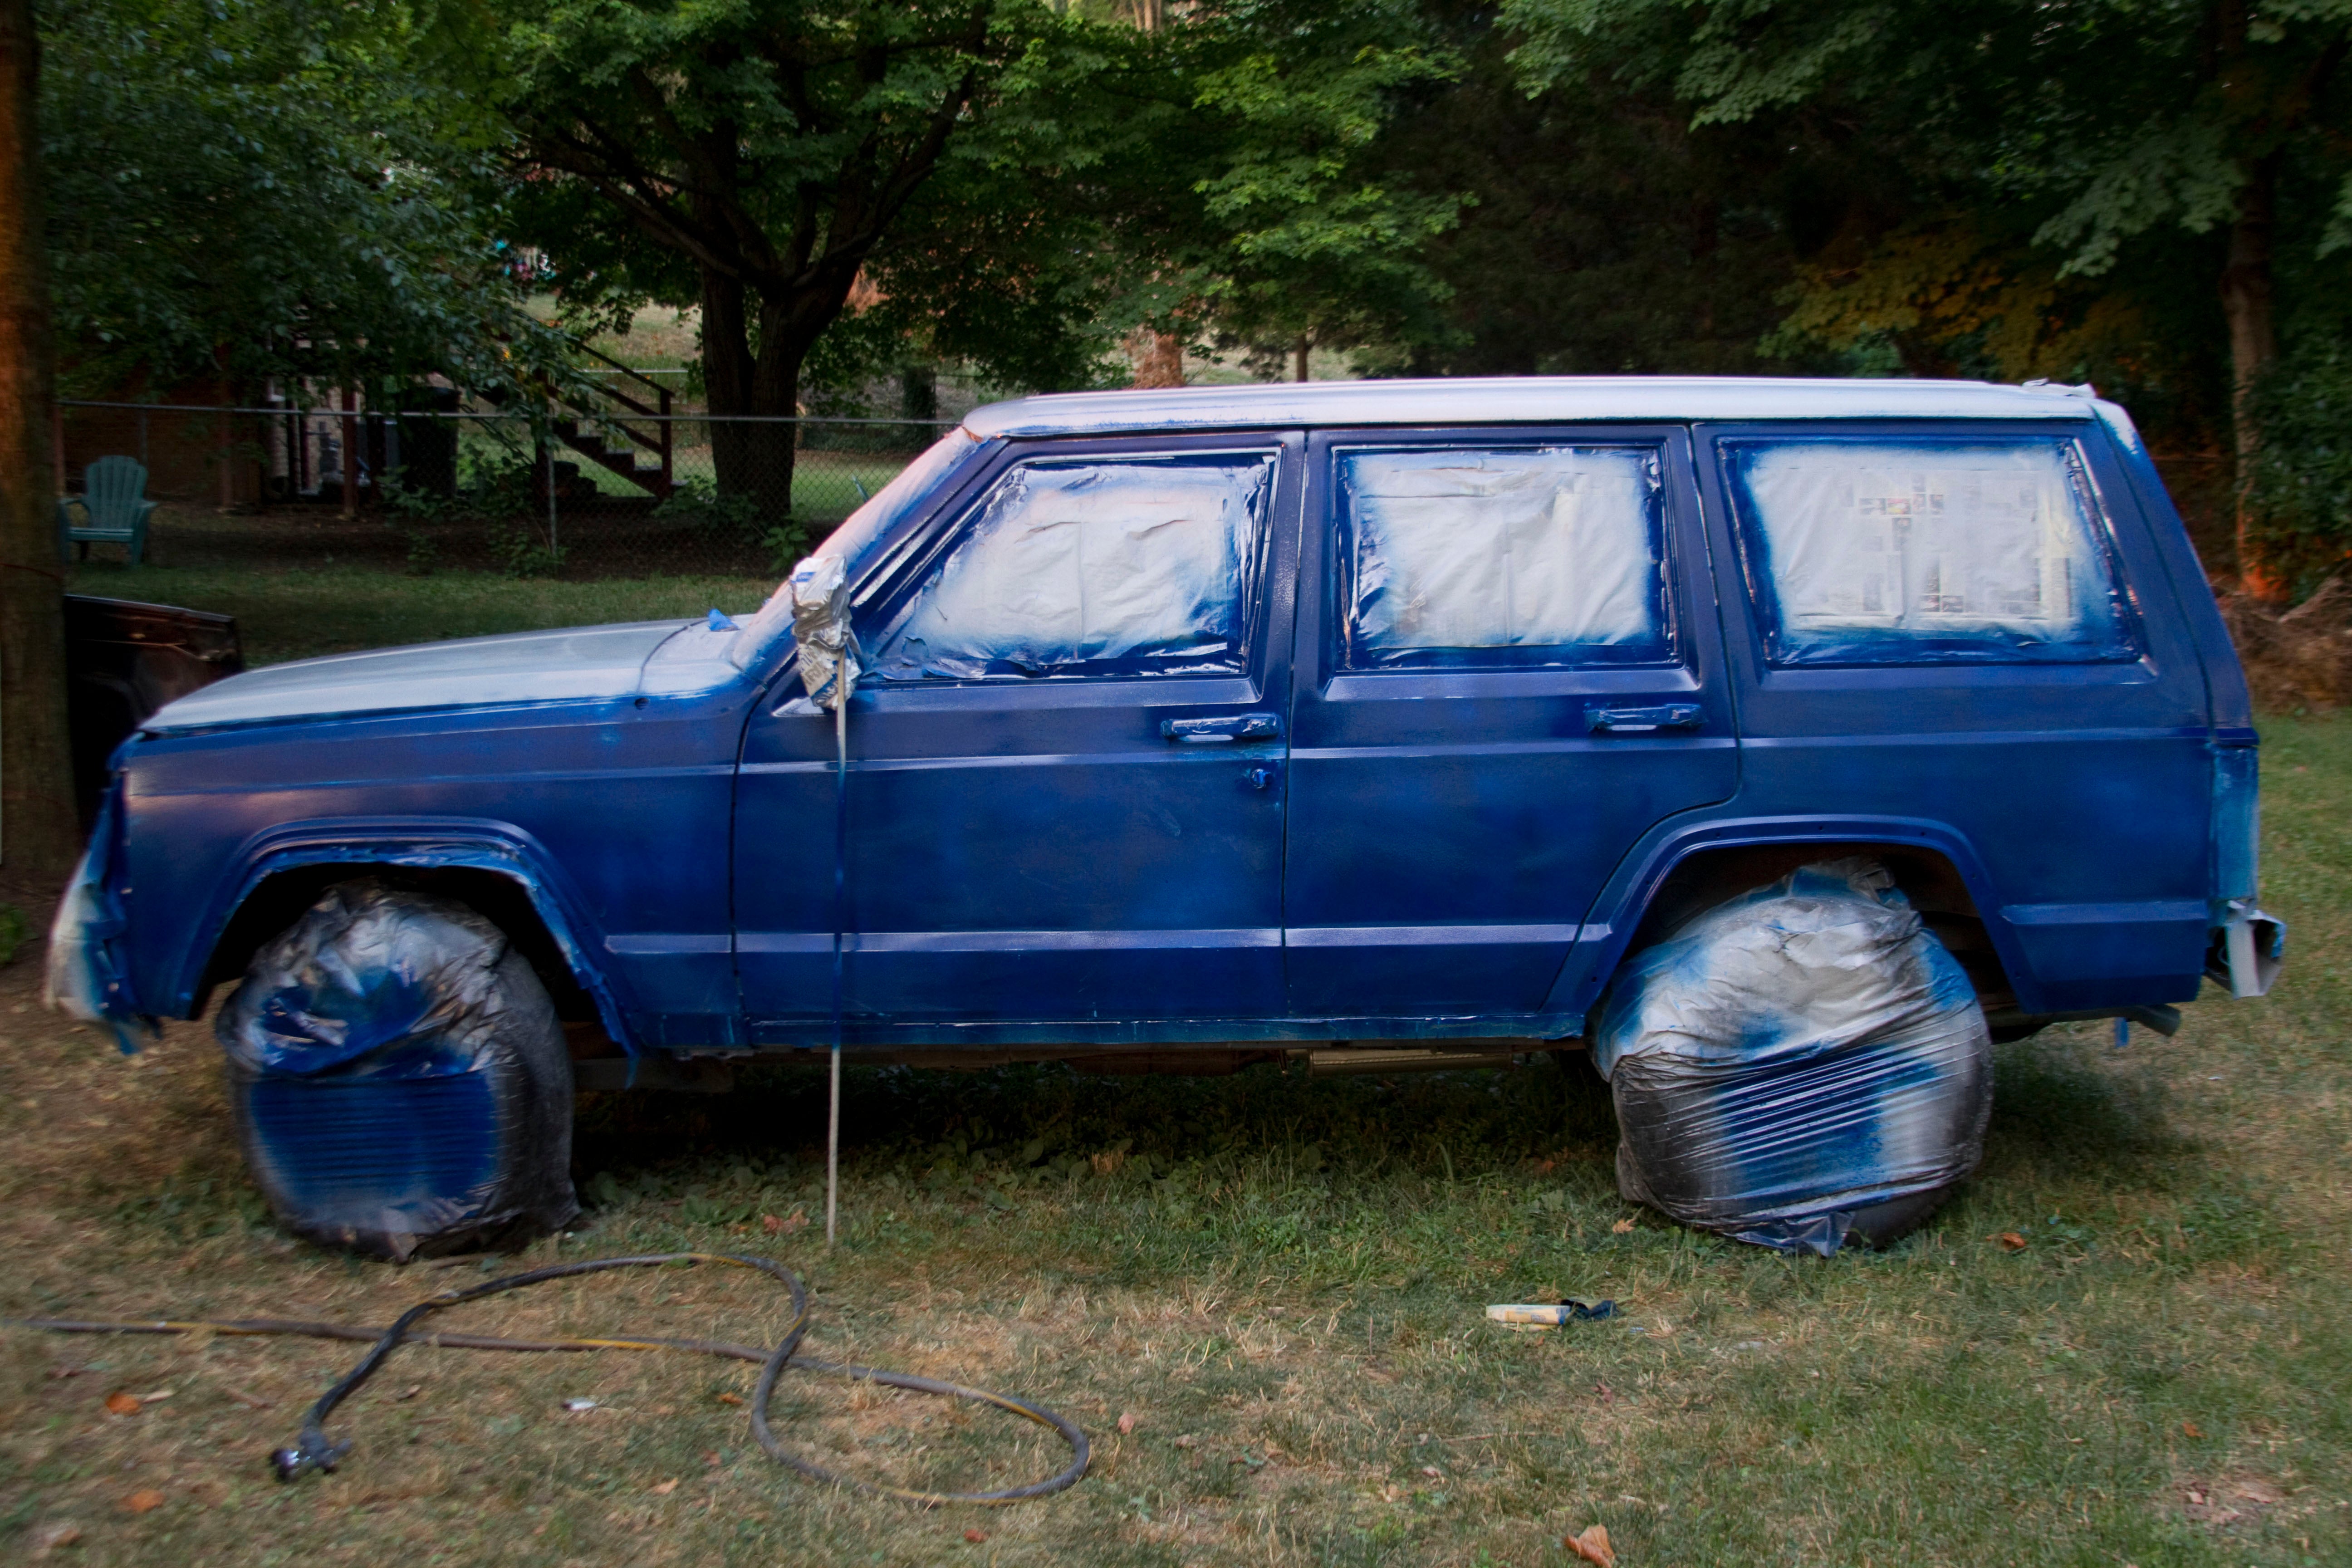
The paint was going on thin, so I assumed the prevailing light blue shade was due to the light gray primer still shining through. However, I put on a few more coats and realized that there was not way this was Midnight Blue. This was more like some ridiculous Electric WRC Legoland Ridiculous Blue. The place with the fancy website must have sent me the wrong paint! Freaking Paintforcars.com, wasting my already apparently worthless time. So I wrote them an angry email featuring my best ebay-appropriate threats (Negative feedback! Negative feedback!) and they promised to ship me another gallon of the appropriate paint. I also included a picture of my car to show them how wrong it looked.
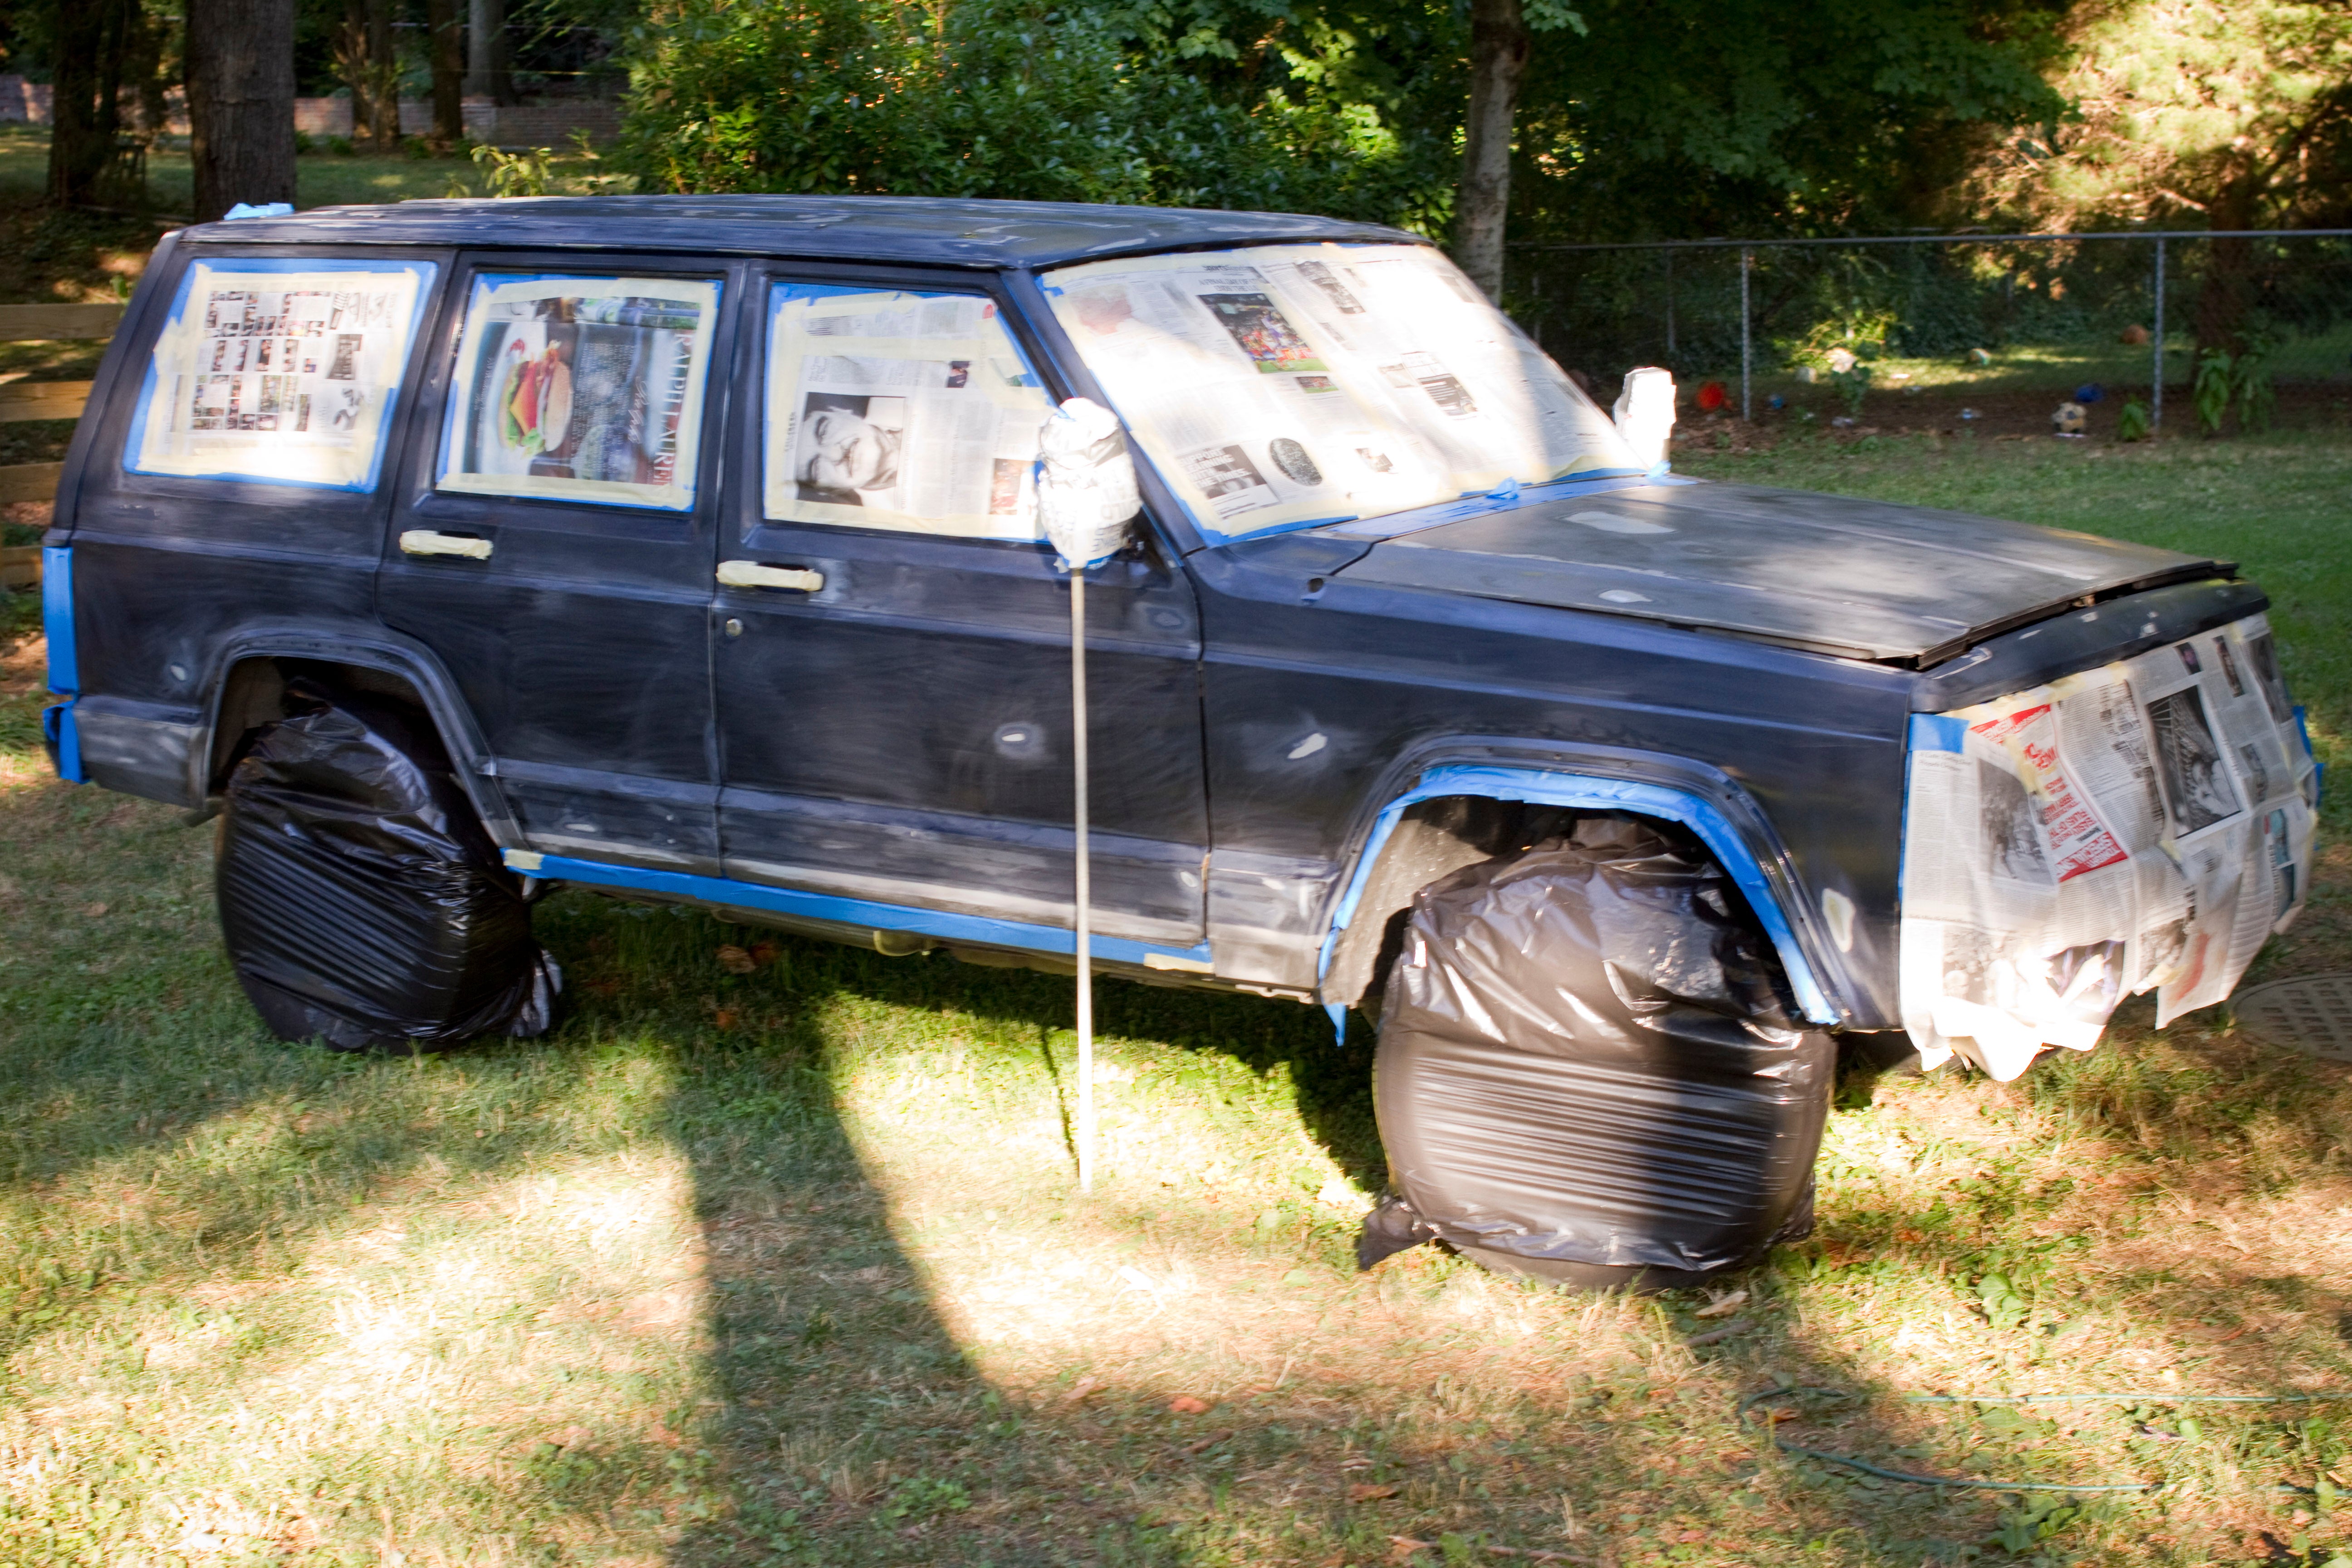
In preparation for the new (correct) paint, I proceeded to sand my car back down to a smooth finish and wait for the new gallon to arrive. When the new paint arrived a couple days later, I mixed up a load and shot it at the Jeep. Surprise surprise, same freaking color. At this point I was too tired to think of reordering and spraying another color. So I finished spraying, shot the company another angry email (for which they gave me a refund for the original paint, hooray for something!), and attempted to finish my lovely Blueberry Pearl car in spite of the unfortunate effect it had on my eyeballs.
I sprayed approximately 7 coats of paint on the car, sanding between every 2 coats or so. There were many nights where I was spraying until midnight or 1am with the help of a couple work lamps. The sound of the compressor chugging every couple minutes only added to my attitude of “F you neighborhood, it’s my yard and I’ll do what I want!” so frowned upon by the (thankfully nonexistent) Homeowners Association.
FYI, I’ve since heard that it may be illegal to paint a car in your yard in Virginia. If you’re considering following in my dirty footsteps, I’d recommend—as I did—not looking into the legality of the whole process, since as we all know, ignorance is a valid excuse for illegal actions.
The Polish
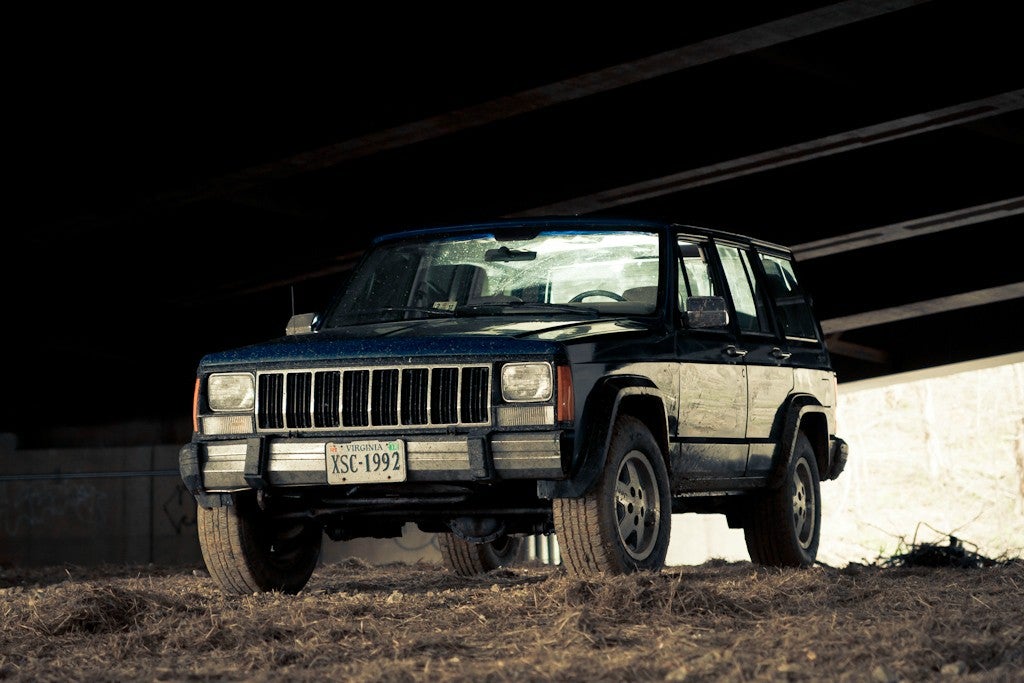
At this point, I had a decidedly unapologetically blue Jeep. I think the hue was pretty much spot-on Subaru WRC blue, which was not near the top of my list of possible paint codes. But what the heck—if I had a Jeep the color of a rally car, at least it was going to be a polished Jeep!
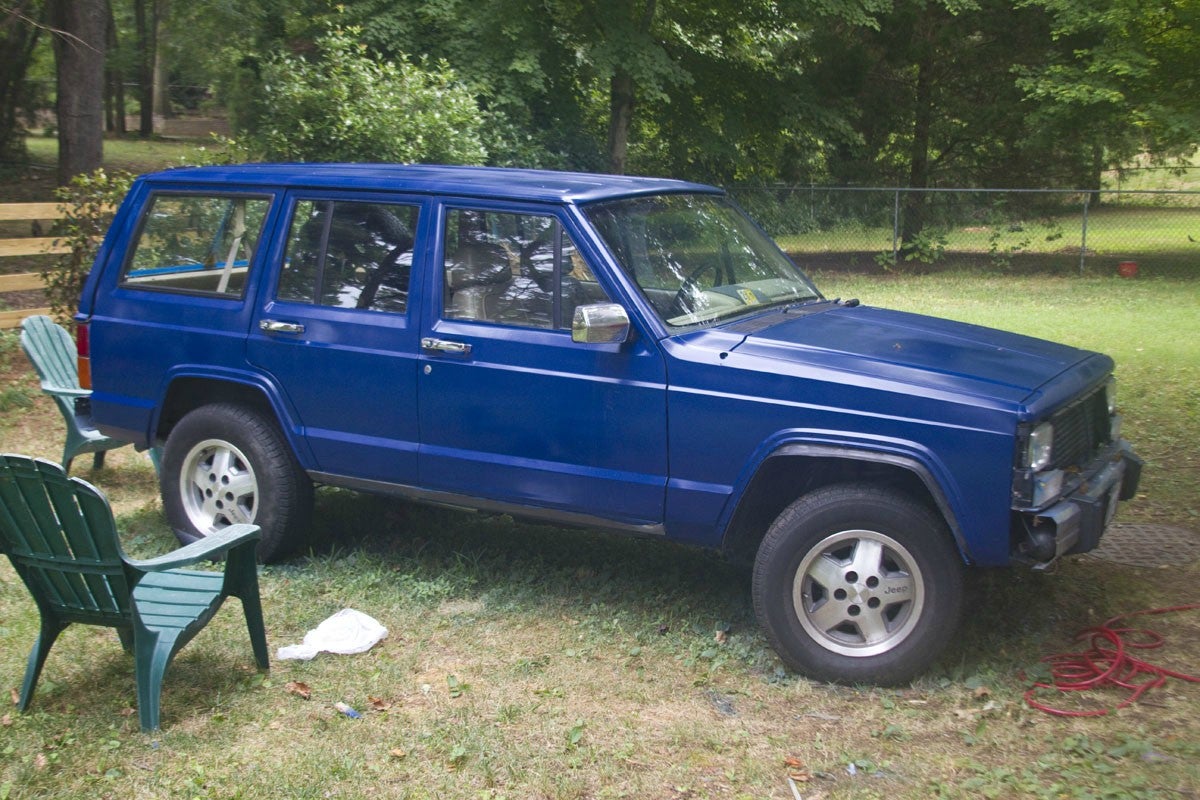
So I took off all of the tape, put the mirrors back in place, and drove the Jeep back to the driveway. Since I now had a drivable Jeep, I was no longer in a hurry to finish up the “post production” (aka buffing and polishing), of which there was much. The only thing that really kept me motivated was the fact that my Jeep looked like it had been sprayed with the most hideous shade of PlastiDip you can imagine (you’ve all seen !!!error: Indecipherable SUB-paragraph formatting!!! !). During the polishing process, I used a combination of electric buffer and elbow grease. I had either Meguires or Turtle Wax cutting compound and polishing paste that I used with the buffing pads (sorry Tavarish, I can’t remember the details).
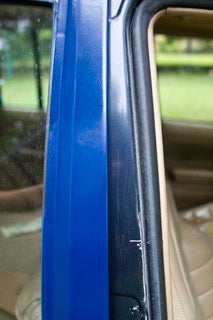
Long story short, I spent about 5 days buffing, sometimes with the help of a friend, at 4-5 hours per day. It was rough. To finish the job, I sprayed the bumpers, rocker panels, and fender flares with semigloss black paint.
The Reveal
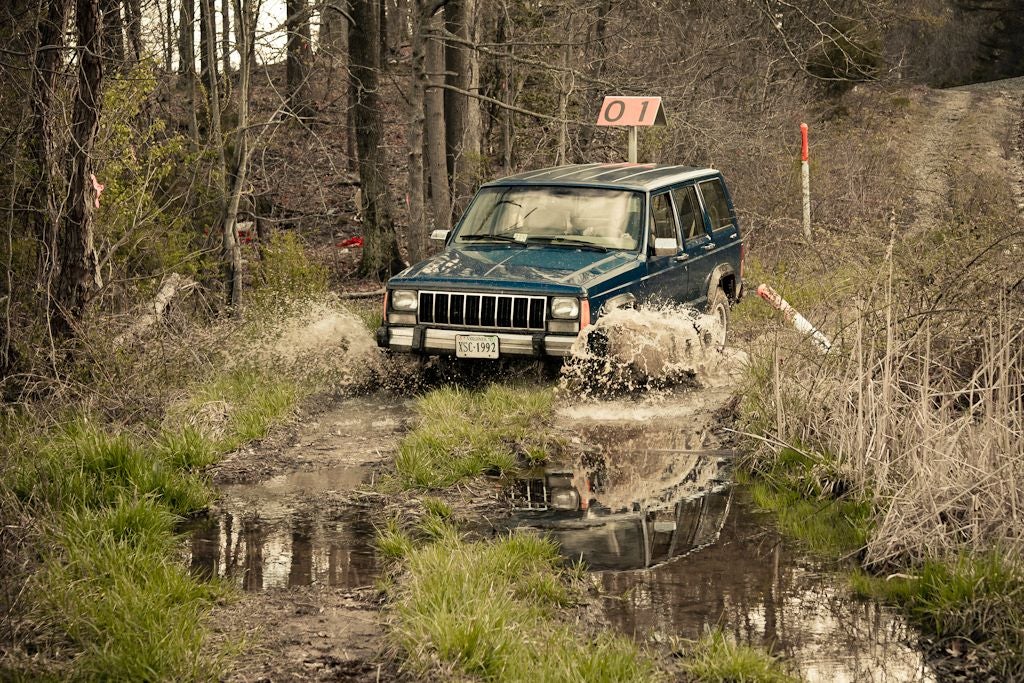
They say that the most important part of a paint job is the prep work. I humbly disagree. From my experience, it’s the polishing that removes the snicker after someone exclaiming “Hey, nice paint job!” It really was a night-and-day difference. And what do you know—the paint actually looked darker after polishing. It was nowhere near Midnight Blue, but at least it had cast all PlastiDip comparisons aside. This was now a Jeep my friends were not so embarrassed to be seen in.
The breakdown
Keeping in mind that this project happened 5 years ago, I will try to remember the costs as best I can:
Paint:
$92
(refunded since it was a stupid color)
Primer: $80
!!!error: Indecipherable SUB-paragraph formatting!!!
: $47 (this one sucked by the way; buy a better one!)
!!!error: Indecipherable SUB-paragraph formatting!!!
: $28
Sandpaper, thinner, buffing pads, polishing paste, and other little bits: $55
Grand total cost of a bitchin paint job:
$210
Now comes the hidden cost: the man-hours calculation:
Comparing, researching, and purchasing paint and supplies: 4 hours
Preparation (sanding and removing trim): 8 hours
Primer and sanding: 8 hours
Paint (and repaint) and sanding: 10 hours
Buffing and polishing: 24 hours
Total man-hours: 54 hours
Of course, this was spread over the course of many evenings, nights, and weekends, but it’s still a butt-ton of work to do. If I valued my time at $20 an hour then I’ve already lost to Maaco. But who actually does any of this purely to save money? What I’ve lost in time and naivete, I’ve gained in knowledge and respect for a craft, and in a deeper relationship with Bonny. At least that’s what I tell myself. Looking back, I can say it was worth it. But would I do it again?
Nah.
 KatzManDu
> MrAaro
KatzManDu
> MrAaro
09/08/2015 at 06:24 |
|
It looks freaking gorgeous. Congrats!
|
MrAaro
> KatzManDu
09/08/2015 at 06:32 |
|
Thanks! I was convinced it was going to be mediocre up until it was polished, so I ended up being really pleasantly surprised.
 random001
> MrAaro
random001
> MrAaro
09/08/2015 at 06:32 |
|
Came out pretty good for a backyard job!! Actually, probably looks better than the maaco job would have been. I salute you, good sir!
 Twingo Tamer - About to descend into project car hell.
> MrAaro
Twingo Tamer - About to descend into project car hell.
> MrAaro
09/08/2015 at 06:43 |
|
I had that with my spray can paint work, looked absolutely terrible but after a good polish it looks damn close to factory.
 Birddog
> MrAaro
Birddog
> MrAaro
09/08/2015 at 07:48 |
|
There’s no such thing as cheap when it comes to this job. As you found out in “post”.
Looks great though.
 atrombs
> MrAaro
atrombs
> MrAaro
09/08/2015 at 08:12 |
|
That is awesome! It must be so satisfying to see it come out that well too. PS - Hi NoVA neighbor!
 Firewrx234
> MrAaro
Firewrx234
> MrAaro
09/08/2015 at 08:37 |
|
Very impressive! I tried something similar on a much smaller scale. I had a rust spot that was starting to eat one of my fenders (the rest of the car was immaculate) and decided to do my own handiwork. (How hard can it be? Right?)
So we (friend and I with more drive than experience) sanded that fender down and threw on a couple layers of primer and sanded it and it was looking good. We then proceeded to the paint (also remarkably great!) Unfortunately the night was approaching quick and unbeknownst to us just how terrible that really is... We got what we assumed was our last coat of clear coat, then said-friend went to “dab” a drip... (This was the beginning of the end) It turned the fresh clear coat into a textured mess and took the clear coat off the surrounding area. So we quickly jumped into inexperienced panic mode and threw another layer of clear on after we thought it was dry enough...another great idea on our part. This final layer went on nothing like the past few coats and went from beautiful showroom finish to “oh my gosh your poor disfigured car”. After it was all said and done the fender looked like an orange on 10x magnification. Coincidentally, it was at that point that I decided to only drive in the right lane with this car so as to avoid as many people seeing the fender as possible.
Long story short, don’t paint or clear coat at or below the minimum temperature....it goes bad very quickly. It wasn’t long after this that said car had catastrophic transmission/radiator failure and nuked the trans. I didn’t have the money at the time and ended up having to sell the car. However I did assume it was the car giving up on life after knowing what I’d done to it.
|
MrAaro
> Firewrx234
09/08/2015 at 08:58 |
|
Haha, ouch! Never dab wet paint!! That’s rule number one of spraying, which thankfully I learned before this project. :D Sorry you learned it the hard way.
 Brickman
> MrAaro
Brickman
> MrAaro
09/08/2015 at 09:43 |
|
Awesome job with crappy paint :P. I plan on going with a single stage urethane from Eastwood for my dads S-10....eventually.
 Laurence
> MrAaro
Laurence
> MrAaro
09/08/2015 at 09:46 |
|
it might not have been the colour you wanted, but that came out really well; I've seen much worse professional jobs
|
MrAaro
> Brickman
09/08/2015 at 09:54 |
|
Good luck! Now you know what you’re getting in to. :D
|
Brickman
> MrAaro
09/08/2015 at 10:05 |
|
I did a whole summers worth of research. All we need is money ;)
|
Firewrx234
> MrAaro
09/08/2015 at 10:11 |
|
Yeah I would've yelled at him to stop if I'd seen him do it but alas I was out of eyeshot at the time...
 SReilly581
> MrAaro
SReilly581
> MrAaro
08/05/2018 at 04:15 |
|
I’ve been doing backyard paint jobs for 40+ years. S ome nice, some well, not so much! Lose the HPLV gun and get an old Binks on E-Bay. No one wants them anymore and they’re cheap used. I got a 2001 in like new shape for $40.00, it makes me look like I know what I’m doing. Uses more air and leaves an oz of paint at the bottom but, so what. I use m y $200.00 HPLV gun for primer (mostly because I feel like an a**hole for buying it). NAPA auto parts sells the Crossfire line of paints at reasonable prices, try some, I think you’ll like it. The “F leet paints” are even less if you like one of the colors, I painted a Cutlass Frightliner blue and it was stunning. Find your own way on painting. You may not do what I do, or what someone else does, but that doesn’t matter if it works for you. Good luck!